Sync Typeform with Salesforce to automatically map Typeform fields every time your form is submitted. This article explains how to set up the connection between your Typeform and Salesforce accounts.
Looking for information on creating and mapping records in Salesforce? Check out our mapping and records guide here!
What you need:
- A Typeform Growth Custom account.
- A Salesforce account.
- Administrator rights in your Salesforce account. If you’re not an admin, you’ll need to contact your Salesforce admin to complete the installation.
Links for installation:
- Install the latest version of the Typeform installation package for Create with Salesforce.
- Install the integration in a sandbox or scratch org.

Note! Make sure to use the link provided above as other resources, for example, the Salesforce AppExchange might include links to the Salesforce Classic integration.
If you're not on a Custom Growth plan, you can use our Salesforce Classic integration. Follow the instructions here to set it up.
Installing the Typeform app in Salesforce
If this is your first time connecting Typeform to Salesforce, go to your Salesforce account first.
- Here, you’ll have to install Typeform as a Managed App in Salesforce as a Salesforce Admin. You can find the Typeform installation package link here.
- You can find the app manager in Salesforce under Platform tools > Apps > App Manager.
- Once you’ve set up the managed app, you’ll need to provide the following information to your Typeform admin to authenticate with Salesforce:
- Salesforce URL
- Consumer Key
- Secret Key
Follow these steps to find your Salesforce Consumer Key and Consumer Secret. Note down this information somewhere as you’ll be asked to provide it when connecting your Typeform account to Salesforce.
- Navigate to Settings > Company Settings > My Domain to find your Salesforce domain information.
Now you’ll see your Salesforce URL under My Domain Settings. Note this down as well.
Installing users and permissions in Salesforce
After you’ve installed the Typeform managed package in your Salesforce org, follow these setup and configuration steps to enable a secure connection between Typeform and your Salesforce org.
Create a Typeform Integration User
Typeform recommends utilizing a dedicated Integration User with minimal access to your Salesforce org as a security best practice. Salesforce provides each org with five free Salesforce Integration type licenses to allow for API Only access to an org’s Data and Processes.
To create a new Integration User for Typeform:
- Navigate to Setup -> Users -> Users
- Click New User.
- Provide the following required details:
- First Name: Typeform
- Last Name: Integration
- User License: Salesforce Integration
- Profile: Minimum Access – API Only Integrations
- Email: A monitored inbox’s email address, could be the SFDC Admin’s email address or an IT Support Group, etc.
- Username: A unique username following the typeform-integration@companyname.com pattern as an example.
4. Click Save to create the user record. This user will not be able to log in interactively and has API Only access to a limited number of objects.
Read on to find out how to assign additional permissions.
Assign Salesforce API Permission Set License
By default, the Salesforce Integration License does not contain licensing access to standard Salesforce objects like Account, Case, Contact, Lead, or Opportunity. The Typeform Integration will require you to add a Salesforce Permission Set License, to grant the Integration User access to these (and other) standard objects. Follow the steps below to grant permission to standard Salesforce objects.
- Open the user you’ve created in the previous step (Setup -> Users -> Users, then click the Integration User’s name in the Users List view. Note: You may need to switch list view filters to All Users to see the Integration user in your org.)
- Hover over Permission Set License Assignments at the top of the page and click Edit Assignments.
- Find the Permission Set License Salesforce API Integration and select the checkbox.
- Click Save to assign this PSL to your integration user.
Create a Permission Set to Allow Integration User to Access Standard Objects
Now that the Permission Set License Salesforce API Integration has been granted, the Typeform Integration User can be granted access to Create/Read/Update standard or custom objects in your Salesforce org. To grant access to these objects, you’ll need to grant object permissions to standard or custom objects for the Integration User. Typeform suggests creating a dedicated Permission Set for this purpose.
- From Salesforce Setup, open Users -> Permission Sets.
- Click New.
- Provide a Label, like “Typeform Integration User Object Access”.
- Provide a Description as desired, for example: “Grants the Typeform Integration User Create / Read / Update / View All / Modify All permission on the following objects: Account, Contact and Lead.”
- Click Save.
- Click Object Settings.
- Choose the object you want to grant access to by clicking on the object’s name.
- Grant the Object Read, Create, Edit, Delete, View All Records, Modify All Records, and View All Fields permissions.
- Grant Edit Access to the fields you expect to use with this object and Typeform in the Field Permissions section, or check the Edit Access box to allow edit access to all fields on the object.
- Click Save.
- Click Object Settings to go back to the list of objects and repeat adding permissions for each object you are planning to use with the Typeform integration.
Note: Only grant access to objects that are going to be used by the Typeform Integration. For example, If you’re not going to use Typeform to create Account records from Typeform responses, you don’t need to provide access to the Account object.
- After adding the objects you need to provide access to, click Manage Assignments at the top of the page and add the Typeform Integration User to the Permission Set.
Assign the Typeform Integration Permission Set
The Typeform Managed Package contains a permission set that grants the Integration User permissions to Typeform objects and Apex Classes. Assign this permission set to the Typeform Integration User.
- Open the user you’ve created in the previous step (Setup -> Users -> Users, then click the Integration User’s name in the Users List view. Note: You may need to switch list view filters to All Users to see the Integration user in your org.)
- Hover over Permission Set Assignments at the top of the page and click Edit Assignments.
- Add the Typeform Integration permission set to the Integration User.
Create External Client App to Authorize Typeform Webhook Integration
The External Client App will provide the Typeform platform with a means to connect to your Salesforce org using OAuth 2.0’s Client Credentials flow. This is a basic OAuth flow that will authorize all connections to run tasks in Salesforce as an Integration User.
Create the External Client App
The External Client App is a mechanism within Salesforce that will expose an integration pathway into a customer’s Salesforce org using the specified authorization pattern. In this case, we’ll set up the External Client App to follow the Client Credentials authorization flow described here.
- Navigate to Setup → Apps → External Client Apps → External Client App Manager.
- Click New External Client App in the upper right-hand corner.
-
Fill out the app’s basic information:
- Connected App Name: Typeform Inbound API
- API Name: Leave as default
- Distribution Status: Local
- Contact Email: Preferably the same email as the Integration User
4. Expand the API (Enable OAuth Settings) section
- Select the Enable OAuth Settings checkbox.
-
Enter the following details:
- Callback URL: https://login.salesforce.com/services/oauth2/callback
- Selected OAuth Scopes: Manage user data via APIs (api), Full access (full)
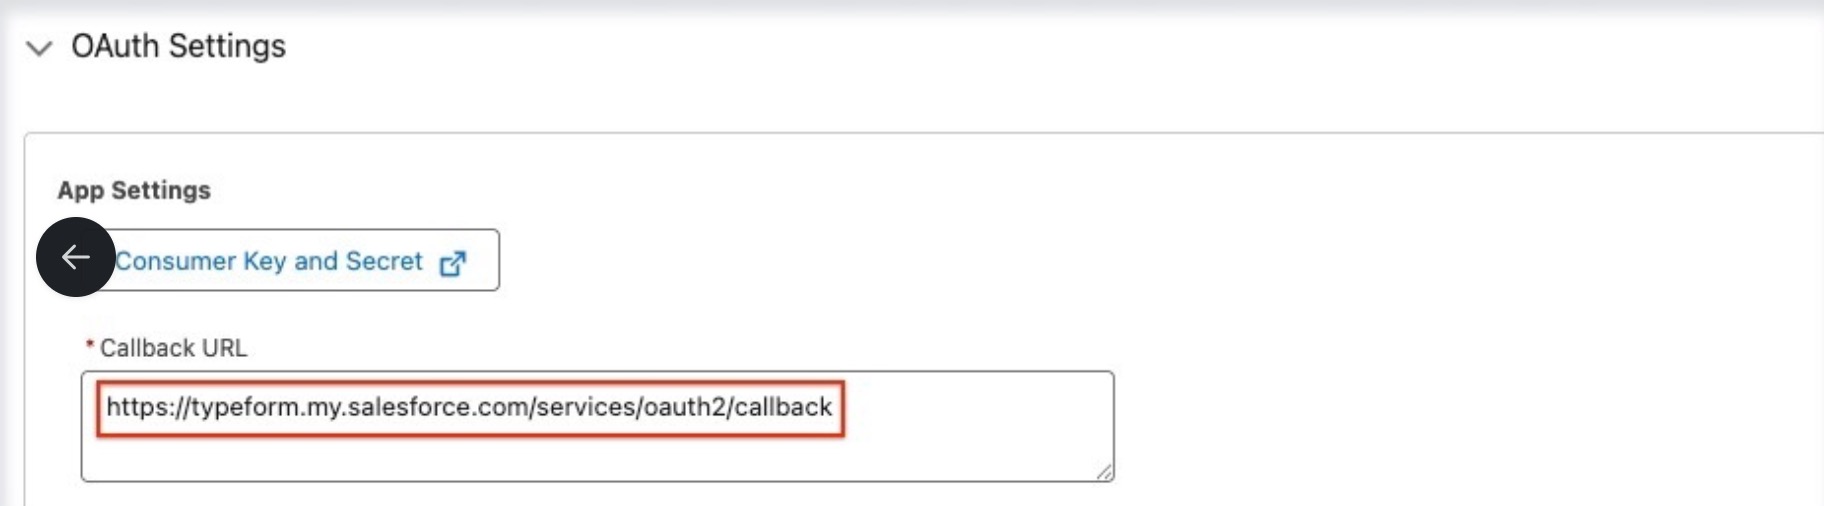
If you're not using login.salesforce.com for production orgs, or test.salesforce.com for sandboxes to log in, your Callback URL is the base URL you're using to log in. In the example below, the Callback URL is https://typeform.my.salesforce.com/services/oauth2/callback, where
typeform.my.salesforce.com is a placeholder for whatever base URL you're using.
C. In the Flow Enablement section, select the Enable Client Credentials Flow checkbox.
D. Uncheck the options in the Security Section.
E. Click Create.
Modify OAuth Policies and Assign Typeform Integration User as the Run As User
After creating the External Client App, you need to set the Typeform Integration User to allow access to your org with the limited permissions/access you granted to the Integration User.
- From the External Client App created in the previous section, expand the OAuth Policies section and click Edit.
2. Set the following Policies:
- Permitted Users: All users can self-authorize
- Select the Enable Client Credentials Flow checkbox: Set the run-as user as the integration user
- Refresh Token Policy: Immediately expire refresh token
- IP Relaxation: Enforce IP restrictions
- Click Save.
Retrieve Connection Tokens for Typeform Setup
The Client Id and Client Secret can be accessed by expanding the OAuth Settings section in the External Client App settings page.
This can be accessed by clicking on the Consumer Key and Secret button and entering the OTP on the External Client App detail screen (External Client App Manager → Settings → OAuth Settings then click the name of the External Client All created in the previous steps).
Store these credentials in a secure location as they will provide access to this Salesforce org to anyone who has the capability to connect via OAuth client credentials flow.
Create Public Site for Webhook
Site Definition
Sites are the precursor to Salesforce’s more modern Experience Cloud environments. They provide access to Salesforce functionality to users that are not part of the customer’s internal employee base (typically partners or customers of the company).
Perform the following steps in Setup:
- Navigate to Setup → User Interface → Sites and Domains → Sites
- Enable the Site domain (if not already enabled)
- Click New.
-
Fill out the Site details:
- Site Label: Typeform Webhook
- Site Name: Leave default value
- Site Contact: Preferably the Salesforce Admin
- Default Record Owner: Preferably the Salesforce Admin or someone who is otherwise managing the Typeform Salesforce configuration
- Active: true
- Active Site Home Page: Unauthorized
- Click Save.
Add Permissions to Typeform.WebhookResponseHandler Apex Class
Permissions will need to be configured to allow webhook calls to this page to perform the necessary operations on the Salesforce side. This should be limited to the bare minimum necessary settings.
- From the Sites page in Salesforce, click Typeform Webhook Site from the list of sites. The text for Typeform Webhook Site is black, you'll see it's a hyperlink when you hover over the text.
- From the Typeform Webhook Site detail page, click Public Access Settings.
- Add the typeform.WebhookResponseHandler Apex classes to the Profile
Integrate with Typeform
Your Salesforce org is now ready to integrate with Typeform! Proceed to your Typeform account to create or link your forms to Salesforce to continue setting up your integration.